Buffalo mini

The Goal
I built this rocket to launch it with just one engine, while still incorporating thrust vector control, a flight computer, and a parachute system. This was especially challenging, as the most powerful engines available to us are of class D. I succeeded at this goal and developed my lightest and probably even one of the world’s lightest TVC rockets ever with a dry mass of only 210g.
Physical Design
Thrust Vector Control

The principle behind this thrust vector control mount is the same as that of Buffalo L. There are, however, differences in its details. This TVC fits into a frame with a diameter of 50mm and allows for ±10° of control in both axes. The servos were not placed next but on each other to fit the system into this diameter.
Through the different distances from the servo gears to the joints and the representative differences in teeth number, the two axes have diverse characteristics. The pitch can be controlled more precisely due to its higher servo gear to the outer gear ratio, while the yaw axis can be actuated faster due to its lower ratio.
Parachute and Structure
The parachute deployment system and the connector system again follow the same principle as that of Buffalo L.
Flight Computer
A key component of reaching this goal was to create a flight computer that is functional enough to operate all these mechanisms, yet light enough to keep the rocket within the design constraints.
Microflight Rev. A

Microflight Rev. A
In 2020, I embarked on designing a flight computer capable of active stabilization in a tiny form factor. I named it Micro Flight Rev. A. This project marked my first attempt at designing a completely SMD flight computer, and it remains the tiniest flight computer I've developed to date. Unfortunately, similar to the Buffalo Rev. C (Buffalo rocket), I never assembled this flight computer due to the lack of assembly equipment like a reflow oven. Nonetheless, it provided invaluable design experience.
Power Supply:
Powered by a three-celled LiPo battery.
Uses ASM1117-5 for 5V (servos) and ASM1117 for 3.3V (rest).
Microcontroller: ATMEGA32U4
Sensor: BMI088 (gyroscope and accelerometer)
Outputs:
1x Indicator LED
2x Servo Ports
1x Pyro Channel
Backup Pins
Buffalo Performance

Buffalo Performance - Rendering
With the knowledge gained from using the assembly service and SMD components, I attempted a second, more refined flight computer in 2022.
This effort led to the creation of the most minimal flight computer design I devised up to this point with a mass of only 10g. A major factor in creating such a lightweight flight computer, was again the selection of the SMD assembly service, as it made the usage of smaller SMD components (0402) feasible.
As the design of this flight computer bears many similarities to the Buffalo Rev. E flight computer described in the Buffalo L section, I will only discuss its differences in the following.
Power Management
Compared to the Buffalo Rev. E flight computer, which requires three-celled LiPo batteries, this board is either powered by a single-celled LiPo battery or directly via micro-USB. Additionally, it features an automatic charging IC (MCP73831T), which enables the board to recharge its LiPo when it is connected through USB.
The input voltage of either the USB (5V) or the battery (4.2V) is regulated by a linear voltage regulator to a voltage of 3.3V, with which all ICs of the board are powered. The chosen voltage regulator (AP2112K-3.3) is the same. In this instance, it was selected as it features a low voltage drop of only 250mA at peak current consumption. This board does not include a regulated 5V line; instead, it utilizes the battery/USB voltage to power the servos, thus contributing to weight reduction.
Microcontroller
The microcontroller circuitry is the same as the one implemented in Buffalo Rev. E. However, I put in place a novel method for reducing weight.
Instead of implementing an additional SD card slot onto the PCB, I used the internal flash storage of this microcontroller module as a place to store the flight files.
Sensors and Outputs
The gyroscope, accelerometer, barometer, and resistor divider are the same as the ones used in Buffalo Rev. E. The most significant difference is that this board only bears the essential outputs.
Buffalo Performance features two servo ports to control its two TVC servos. The flight computer indicates its current flight states by an onboard RGB-LED and features two backup pins to which a Runcam for onboard footage could be attached.
Lastly, it features two pyro channels for engine ignition and parachute deployment. However, they do not possess the continuity test button.
Software
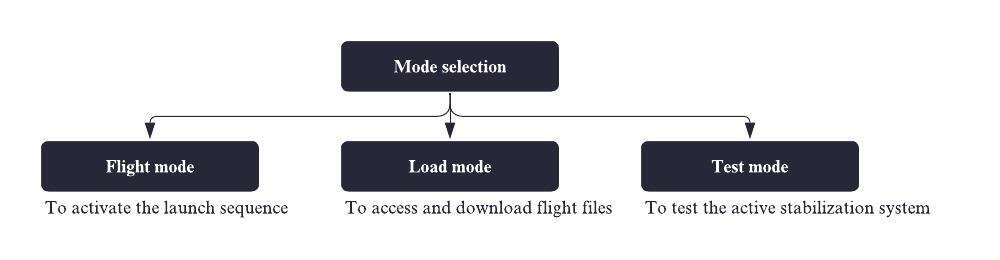
After powering Buffalo performance on and connecting to it via Bluetooth, the user can select the operation mode.
If the flight mode is selected, the flight computer permanently sends its current battery charge state via Bluetooth. The launch countdown is started by sending a start string and is quit by sending a stop string. If the countdown goes through all the way from T-30s to T-0s, the rocket ignites its own engine and lifts off from the launch structure. It is possible to remotely abort the flight, causing the parachute to open immediately. The parachute is also deployed if the rocket crosses a specific orientation threshold. In nominal flight, the parachute deployment is triggered by the rocket detecting maximum apogee or by exceeding a maximum flight duration. Finally, the rocket saves the flight data onto its flash memory.
The active stabilization part of the software is similar to that of Buffalo L.
Testing

PID tuning
The rocket is tuned with the help of a drone motor test stand I created in 2020 to evaluate the perfect PID gains. It is attached to the gimbal at the with the drone motor combined center of gravity. The gimbal allows for movement in both the yaw and pitch axis, and the drone motor runs at a speed that creates a force that matches the real rocket engine’s thrust. For that, I previously characterized the drone motor on a weight scale.
Flights
In total, I launched the rocket four times. The first two flights were on the same day. During the first flight, the stabilization system failed mid-flight. The reason was a strong crosswind and insufficient PID gains. The second flight was with the same gains but turned out better because the wind was not as strong. After these two flights, the rocket was retuned. The third and fourth flights then went even better. On the third flight, the stabilization system performed at its best. However, the parachute opened too early due to misinterpretation of the accelerometer. On the fourth flight, the parachute opened at the ideal time, but the stabilization system showed room for improvement. Footage of these flights can be found inside the Maker Portfolio Video.
Videos about the Project
Project by Johannes Moser